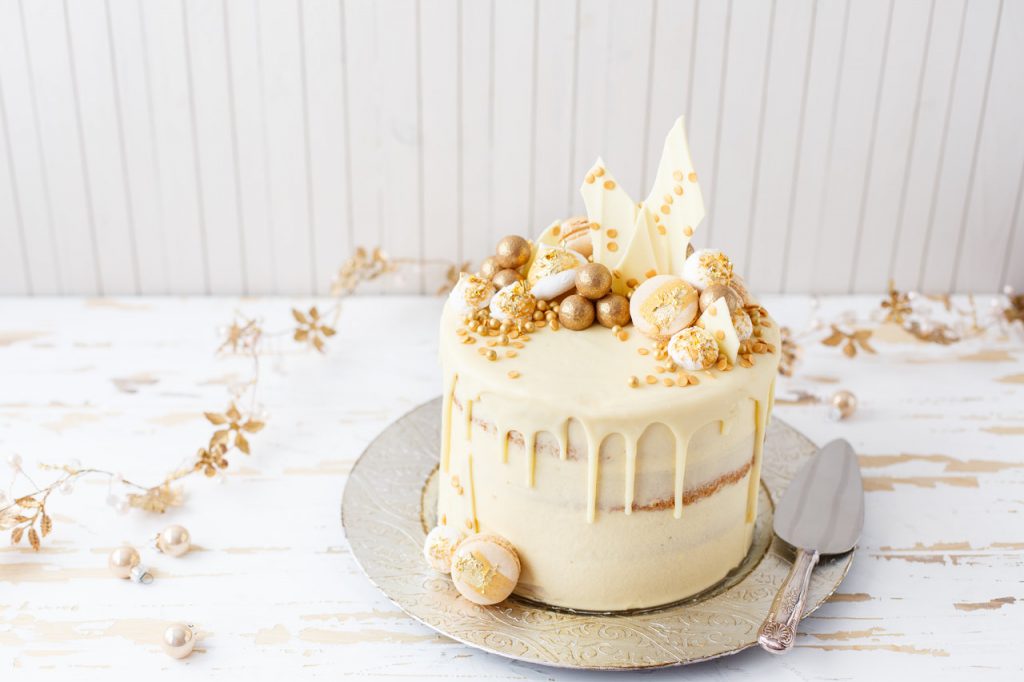
Spiced Tipple Cake
Intermed..
The flavours in this showstopper cake are inspired by the flavours of eggnog. The sponge is lightly spiced with nutmeg and cinnamon and the frosting is flavoured with brandy, but you could use your favourite tipple instead. Whiskey, eggnog’s traditional dark rum, Irish cream, even kalua would be delicious options in the frosting. Watch the video here
SERVE
10-15
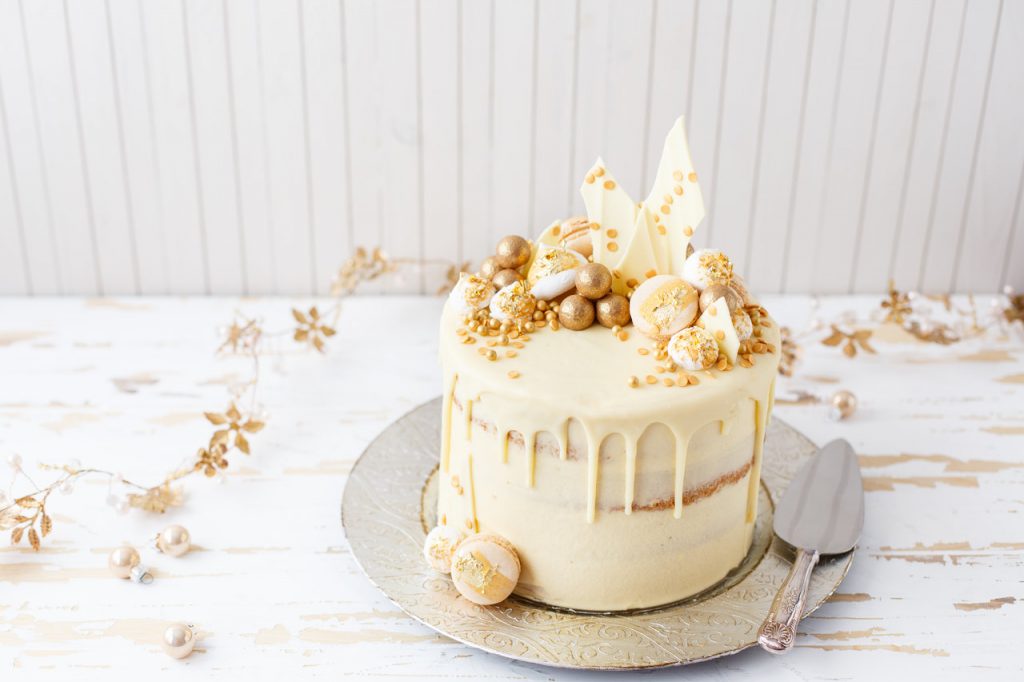
Spiced Tipple Cake
Intermed..
Introduction
The flavours in this showstopper cake are inspired by the flavours of eggnog. The sponge is lightly spiced with nutmeg and cinnamon and the frosting is flavoured with brandy, but you could use your favourite tipple instead. Whiskey, eggnog’s traditional dark rum, Irish cream, even kalua would be
READ MORE
Ingredients
- 350g unsalted butter, softened
- 750g icing sugar, sifted
- 5 tbsp brandy
- 2 tbsp milk
- 1 tsp vanilla extract
- 150g white chocolate, roughly chopped
- 75g double cream
- White chocolate shards
- Mini meringues
- Chocolate truffles
- Macarons
- Gold sprinkles
- Edible gold paint or lustre dust
- Edible gold leaf, optional
- 450g self-raising flour
- 450g caster sugar
- 450g unsalted butter, very soft
- 8 eggs
- 2 tsp vanilla extract
- 1 tsp salt
- 1 tsp grated nutmeg
- ½ tsp ground cinnamon
FOR THE FROSTING:
FOR THE GANACHE DRIP:
TO DECORATE:
FOR THE SPONGE:
Method
- 1. For the sponge, preheat oven to 180°C / 160°C fan assisted / gas 4. Grease and flour the sides of 4x 20cm (8inch) round cake tins and line the bottom of each with parchment paper. Combine all the sponge ingredients together in a large bowl. Mix with an electric hand mixer or stand mixer just until all the ingredients are combined. Make sure to scrape down the sides of the bowl halfway through mixing.
- 2. Divide batter evenly between the 4 prepared cake tins. Bake for 25-30 minutes, or until a toothpick inserted in the centre of the cakes come out clean.
- 3. Remove from oven and leave to cool in the baking tins for 10-15 minutes on wire cooling racks, then carefully turn sponges out on wire racks and leave to cool completely. Carefully peel away parchment paper once cooled.
- 4. For the frosting, beat butter in a large bowl with an electric mixer until smooth. Add the icing sugar, milk, brandy and vanilla. Start beating together with a mixer on the lowest speed, once most of the sugar has been mixed in, increase speed and beat until frosting is smooth and creamy. Make sure to scrape down the sides of the bowl so that everything is well incorporated.
- 5. To assemble the cake, place one of the sponges on a cake board or serving plate. Evenly spread about 2/3 cup of frosting on top of the cake. Place another cake sponge on top and repeat with a layer of frosting until all the cake sponges are stacked with frosting between each one.
- 6. Use the remaining frosting to cover the entire cake with buttercream, making sure there is a generous amount on top of the cake. This doesn’t have to be done very neatly, just make sure the entire cake is covered and any gaps between sponges are filled.
- 7. Use a long flat palette knife to smooth the top so that the surface is smooth and level. Then either use a large bench scraper or the palette knife to smooth the sides of the frosting, scraping away the excess. The easiest way to do this is to have the cake on a cake decorating turntable or on a Lazy Susan. Hold the edge of the bench scraper or palette knife perpendicular and right against the cake, keeping the scraper or palette knife still and steady with your one hand, use the other hand to turn the turntable until you have smoothed and scraped around the sides of the entire cake. Remember, you want the frosting to be scraped right up to the sponge in some places so that you get that rustic semi-naked cake look. Lastly, smooth down any edges at the top of the cake that may have risen up.
- 8. Keep any leftover buttercream to use later while decorating. Place in a small bowl covered with clingfilm, this can be kept at room temperature.
- 9. Place cake in the fridge and chill for at least an hour. The frosting must be firm and well chilled before doing the ganache drip.
- 10. For the ganache drip, place the chopped white chocolate in a medium sized heat-proof bowl, set aside. Pour the cream into a small pot and heat just until it starts to bubble around the edges. Remove from heat and pour scalded cream over the white chocolate. Gently mix until all the chocolate has melted and the ganache is smooth. Tip: If the cream cools too quickly so not all the chocolate has melted, place bowl over a small pot of steaming water and mix just until chocolate has melted and mixture is smooth.
- 11. Leave to cool, stirring occasionally. The ganache is ready to pour when it is the consistency of cold honey or golden syrup, if you have a food thermometer, it will be between 30°C-35°C.
- 12. Remove the cake from the fridge then spoon some of the white chocolate ganache on top in the centre, smooth out with a small palette knife. Spoon small amounts of the white chocolate ganache right at the edges of the cake allowing it to drip over the sides, you can encourage the drip by pushing the ganache over the edge with the spoon. Once the drip has been done around the entire cake, fill any missing spaces with remaining ganache and smooth with a small palette knife. At this stage the ganache might be near set, so heat the knife in boiling water, dry it off and then use it to smooth over the top. Place cake in the fridge to help the ganache drip set.
- 13. For this showstopper look, prepare white chocolate shards ahead of time. Use an edible gold paint (or mix your own by using a few drops of vodka with edible gold lustre dust) to paint streaks on mini meringues and macarons.
- 14. Place a dollop of leftover buttercream on top of the cake, off centre. Stick a few shards of white chocolate bark in the frosting, standing straight up. Then arrange macarons and mini meringues around the shards, hiding the frosting as you add more. Fill any gaps with chocolate truffles or any other edible decorations you may have. Arrange them in a moon shape around one side of the cake, with the larger meringues and macarons near the centre, and smaller meringues and truffles near the ends. Use small sprinkles to finish the effect around the edges. And for that extra special finish, decorate with edible gold leaf.
- 15. Cake can be kept at room temperature until ready to serve. Will keep for up to 3 days in an airtight container in the fridge. Although, this is a very large cake and you might not have a large enough container, so our tip is to cut into slices and lay the slices down in a large airtight container and store in the fridge. Best when eaten at room temperature, so allow slices to sit out to lose the chill before enjoying.
- 16. Cake sponges can be made ahead and frozen until needed, up to a month ahead. Simply allow to cool completely, then place each sponge in between two sheets of parchment paper, then place each one into sealable freezer bags. Remove as much air as possible from the freezer bags before sealing. Leave to thaw overnight in the fridge still in the freezer bags.
- 17. Buttercream can be made up to 2 days ahead and kept in an airtight container in the fridge. Allow to come to room temperature, then give it a quick mix with a spatula to make sure it’s smooth and spreadable.
