Top 3 Christmas Baking Recipes
Mon Dec 04 2017
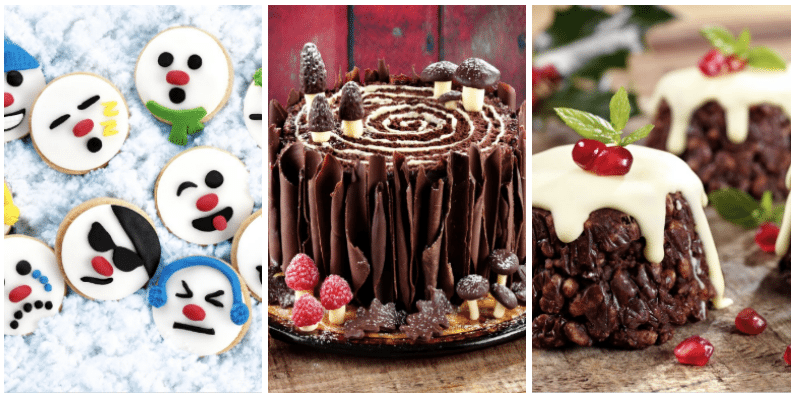
Have a magical Christmas with NEW sleighing recipes from Dr. Oetker! Here are there top 3 Christmas Baking recipes:
With Dr. Oetker Baking’s Chocolate Pudding Crispies, Snowman Emoji Biscuits and Woodland Christmas Yule Log Cake, you’re guaranteed to impress your friends and family with your sleighing bakes this Christmas!
Christmas Chocolate Pudding Crispies

Preparation Time: 30mins Cooking Time: 10mins Serves: 6
Ingredients:
- 150g (5oz) Dr. Oetker 54% Dark Fine Cooks’ Chocolate
- 50g (2oz) Lightly salted butter
- 65g (2 ½ oz) Golden syrup
- 65g (2 ½ oz) Toasted rice cereal (Rice Krispies)
- 100g (3 ½ oz) Digestive biscuits, crumbled into small pieces
- 2.5ml (1/2tsp) Dr. Oetker Natural Vanilla Extract
To decorate:
- 100g (3 ½ oz) Dr. Oetker White Fine Cooks’ Chocolate
- Mint leaves and pomegranate seeds
Method:
- Line 6 muffin tins with cling film. Break up the Dark Chocolate and place in a saucepan. Add the butter and syrup. Place over a low heat, and stir gently until melted. Cool for 10 minutes.
- Stir in the rice cereal, biscuits and Vanilla Extract, and mix well to make sure everything is well coated. Transfer to a bowl and leave to cool.
- Divide the mixture between the muffin tins, piling it up and then pressing down well with the back of a spoon to make sure the tins are well packed with mixture. Chill for at least an hour until firm and set. Using the cling film to help, carefully pull out the mixture from the muffin tins, unwrap and place upside down on a wire rack.
- To decorate, break up the White Chocolate and place in a small heatproof bowl and place over a saucepan of barely simmering water to melt. Remove from the water and cool for 10 minutes.
- Use a teaspoon to dollop the melted White Chocolate on top of each crispy cake, allowing it to drip down the sides to resemble custard. Leave for about 30 minutes in a cool place to set before decorating with mint leaves and pomegranate seeds. Your crispy chocolate puddings are now ready to serve and enjoy!
TIP: Add 1g (2.5ml/1/2 tsp) ground cinnamon or mixed spice for a traditional Christmassy flavour.
Snowman Emoji Biscuits

Preparation Time: 45mins Cooking Time: 15mins Serves: 14
Ingredients:
- 100g (3 ½ oz) Lightly salted butter, softened
- 40g (1 ½ oz) Caster sugar
- 2.5ml (1/2 tsp) Dr. Oetker Madagascan Natural Vanilla Extract
- 1g (2.5ml/1/2 tsp) Ground mixed spice
- 165g (5 ½ oz) Plain flour + extra for dusting
To decorate:
- 225g (8oz) Dr. Oetker Regal-Ice
- Icing sugar to dust
- 20g (15ml/1 tbsp) Clear honey
- 25g (1oz) each of Dr. Oetker Ready to Roll Regal-Ice Coloured: Black, Red, Green, Yellow and Blue
Method:
- Preheat the oven to 190˚C (170˚C fan oven, 375˚F, gas 5). Line a large baking tray with baking parchment. In a bowl, beat the butter and sugar together until soft and creamy. Stir in the Vanilla Extract.
- Sift the flour and spice on top, and stir into the creamed mixture, then bring together with your hands to form a soft dough.
- Turn on to a lightly floured surface and knead gently until smooth. Roll out to a thickness of 1/2cm (1/4inch) – the mixture will be quite soft and short. Using a 6cm (2 ¼ inch) round cutter, stamp out 14 rounds, re-rolling the trimmings as necessary.
- Arrange on the baking tray, spaced slightly apart, prick the tops with a fork and chill for 30 minutes.
- Bake for about 15 minutes until lightly golden. Cool for 5 minutes then transfer to a wire rack to cool completely.
- To decorate, gently knead the Regal Ice for a few seconds to make more pliable. Lightly dust the work surface with icing sugar and roll out the Regal Ice to about the thickness of a £1 coin. Using the same cutter, stamp out 14 rounds, re-rolling the icing as necessary. Reserve the trimmings for the emoji features.
- Brush the tops of the cookies lightly with honey and place a Regal Ice disc on top. Gently smooth the disc of icing with your fingertips to create a professional finish.
- Working on whichever colour of Ready to Roll you want to use first, knead it gently before using it to make the features shapes for the snowmen emojis. For eyes, break off tiny pieces and roll into balls, then press into place using your fingertips. Mouths can be made from tiny sausage shapes of icing and then curved and pressed on top of the iced cookie, or tiny balls of Black to make a more traditional snowman mouth. Roll tiny pieces of Blue icing into balls for tears. Use tiny pieces of reserved Regal Ice for teeth and score them lightly with a knife to add detail
- If you want to give the snowmen hats, use a piece of your favourite colour, roll out the icing thinly and then use the same round cutter to cut a circle. Trim the circle down into a crescent shape and stick on to the iced cookie using a little water. Add woolly texture by dotting with a skewer, and don’t forget a small ball of icing for the bobble!
- Once you’ve finished your decorating, leave the cookies for about an hour to dry a little before serving.
Woodland Christmas Yule Log Cake

Preparation Time: 3hrs Cooking Time: 40mins Serves: 16-20
Ingredients:
- 12 Medium eggs
- 225g (8oz) Caster sugar
- 225g (8oz) Plain flour
- 3 x 25g Sachets/ 75g (3oz) Dr. Oetker Fine Dark Cocoa Powder
To decorate:
- 150g Dr. Oetker White Fine Cooks’ Chocolate
- 225g (8oz) Lightly salted butter, softened
- 425g (15oz) Icing sugar + extra for dusting
- 10ml (2 tsp) Dr. Oetker Madagascan Natural Vanilla Extract
- 60ml (4tbsp) 15ml Whole milk
- 1 x 25g Sachet (1oz) Dr. Oetker Fine Dark Cocoa Powder
- 300g (10oz) Dr. Oetker 54% Dark Fine Cooks’ Chocolate
- 75g (3oz) Dr. Oetker Liquid Glucose
- A few fresh raspberries, optional
Method:
For this recipe, you need to make 3 Swiss roll sponges. These individual sponges are halved and wrapped round each other to make one large sponge roll which forms the tree stump.
- Preheat the oven to 200°C (180°C fan oven, 400°F, gas 6). Grease and line the base of a 25 x 38cm (10 x 15 inch) Swiss Roll tin with baking parchment.
- Working on one sponge at a time, whisk 4 eggs with 75g (3oz) caster sugar for 4-5 minutes until thick, pale and the consistency of lightly whipped cream.
- Sift 75g (3oz) flour and 25g (1oz) Cocoa on top. Using a large metal spoon, gently cut through and fold the ingredients together until well blended taking care not to over-mix and lose the fluffy texture.
- Pile into the prepared tin. Smooth the surface and bake for 8-9 minutes until risen and just set, but not crusty.
- While the cake is in the oven, lay a clean tea towel on a wire rack and lay a sheet of baking parchment on top. As soon as the sponge is cooked, turn the sponge on to the parchment, sponge-side down. Leave the tin lining paper in place, cover with another clean tea towel and leave to cool for 30 minutes.
- Meanwhile, prepare the White Chocolate butter icing filling. Break up 100g (3 ½ oz) White Chocolate into a heatproof bowl and place over a saucepan of barely simmering water to melt. Remove from the water and leave aside to cool for 10 minutes. Meanwhile, put 150g (5oz) butter in a bowl and beat until smooth and glossy. Gradually sieve and mix in 300g (10oz) icing sugar to make a firm icing, then mix in the melted white chocolate, the Vanilla Extract and 30-45ml (2-3 tbsp) milk to make a softish, spreading icing.
- Unwrap the sponge and discard the paper. Transfer to a large board and trim away a thin strip from all of the edges to remove the crust. Spread the sponge evenly with one third of the icing making sure it reaches right to the edges. Slice down the length of the sponge to make 2 equal strips.
- Carefully roll up one sponge tightly like a Swiss roll – it may crack but try and roll as neatly and tightly as possible to give a good swirl effect for the centre of the cake. Lay the rolled sponge at the end of the other strip of cake and roll up to make a fat Swiss roll.
- Following the same directions as above in steps 2-5, relining the tin, make and bake 2 more sponges using the remaining ingredients. Spread with icing as above and wrap around each other as described above to make a large chunky Swiss roll approx. 18cm (6inch) diameter, 10cm (4inch) deep. Transfer to a serving plate or board, and cover loosely with cling film to keep fresh and prevent from drying out. Leave in a cool place. If the room temperature is very warm, chill the cake for about 30 minutes to firm up. Prolonged chilling will dry the texture of the sponge.
- Next, make the chocolate paste. Break up 100g (3 ½ oz) Dark Chocolate into pieces and place in a heatproof bowl over a saucepan of barely simmering water to melt. Remove from the water and stir in 50g (2oz) Liquid Glucose to form a thick paste. Scrape on to a piece of baking parchment and leave to cool – the mixture will become firm and pliable when cold. Avoid prolonged chilling as the paste will become too hard to mould.
- Put the remaining White Chocolate in a small heatproof bowl and melt as above. Mix in the remaining Liquid Glucose and leave to cool as above.
- Now prepare the bark for the outside of the cake. Melt half the remaining Dark Chocolate as above. Remove from the water and mix well. Spread over a large upturned clean, uncoated (not non-stick) or enamel baking tray or clean board to make an oblong approx. 30 x 20cm (12 x 8inch). Tap the tray or board to smooth the chocolate and leave in a cool place for a few minutes until almost set – the surface will look dull rather than glossy but still able to retain a fingerprint when ready to use. Line another tray or board with baking parchment.
- Wedge the tray or board against your torso. Using a pallet knife, hold the knife carefully at the blade tip with one hand and the handle with the other, starting at the edge of the chocolate furthest away from you, slice underneath the chocolate layer, holding the blade at a slight (20-30°) angle. As you slice through and drag the blade through the chocolate towards you, it should form a slightly curling roll up and over the knife blade. The length and thickness of the roll or curl depends on the length of time you slice the blade through the chocolate and the angle you hold the knife blade. You will need to turn the tray or board of chocolate in order to make more curls. Aim to make the chocolate curls as long as the depth of the cake – approx. 10cm (4inch). For extra guidance – see TIPS.
- Transfer each piece of chocolate to the lined board. Leave in a cool place to firm up until you are ready to assemble the cake. Melt the remaining Dark Chocolate and prepare another batch of long chocolate rolls. You will need about 40 in total.
- Use the remaining butter, icing sugar, Cocoa Powder and milk to make up another batch of spreadable butter icing. Spread the icing all around the side of the cake to cover it. Press the Dark Chocolate curls on to the side of the cake to resemble bark, trimming them to fit, as necessary.
- Use half of the Dark Chocolate moulding paste to make different sized mushroom and toadstool tops. Use the White Chocolate paste to make the stalks. The tops should stick naturally to the stalks other once gently pressed together. Gently press on to and around the cake to decorate – for the mushrooms on top of the cake, push wooden cocktails sticks or dried spaghetti into the stalks to help them stand upright on the cake. Use raspberries to make red toadstool caps if preferred. The chocolate paste will become soft quite quickly as it is being shaped. If it is over-handled and becomes sticky, place in the fridge for about 30 minutes to firm up again.
- For the leaves, divide the remaining Dark Chocolate paste into walnut-sized pieces. Flatten as much as you can with your fingers and then place between 2 sheets of clear acetate. Roll the top with a rolling pin to flatten the paste to the thickness of a £1 coin. Carefully peel the paste away from the acetate to free it, then place loosely on a sheet of baking parchment. Use a leaf cutter to cut out a leaf – we used an oak leaf cutter. The paste is pliable so once you have scored the leaves with a skewer, you should be able to bend them to make them a more 3D effect.
- Gather up the trimmings to make more leaves and arrange on and around the cake. To finish, lightly dust the top of the cake with a little icing sugar. Your show-stopping cake is now ready to serve and enjoy! Note: remove cocktail sticks before slicing and serving the cake.
TIPS: Working with chocolate can be tricky to start with but once you recognise the stages of chocolate as it sets, it will become much easier. If the chocolate is too soft, it won’t hold shape, and if it is too firm it will splinter instead of curling. Unless your kitchen is very warm, avoid putting chocolate in the fridge as this is likely to cause the chocolate to set too quickly and become too firm to work with.
A large bladed knife works well for making long curls, but you may prefer to use a scraper or similar flat, thin blade. The trick is to get the blade in between board and the bottom of the chocolate layer so that the chocolate almost peels away from the board as you apply pressure to the knife. You may find it easier to work the chocolate by pushing the knife away from you, but make sure the tray or board of chocolate is wedged so that you have something to push against.
The easiest chocolate for curling is one with a higher fat v cocoa content. If you feel less confident using Dark Chocolate on its own, try melting half Dark Chocolate with half Dr Oetker Scotbloc Chocolatey Cake Covering. This will give you a much more pliable chocolate to work with.
If you find the curls are too tightly wound, it may be possible to prise them apart slightly before the chocolate sets completely, otherwise, leave them to harden off in a cool place and then carefully try to separate them.
Any shards that don’t curl can either be re-melted, or broken up and used as shavings which you could roll the cake in instead if you prefer.
